Self-hosted media center on K8s
Overview
- FlareSolverr: proxy server to bypass Cloudflare protection.
- qflood: qBittorrent client with Flood UI.
- FlareSolverr: Indexer manager/proxy built on the popular arr net base stack to integrate with your various PVR apps.
- Prowlarr Indexer manager/proxy built on the popular arr net base stack to integrate with your various PVR apps.
- Sonarr: tv series collection manager for Usenet and BitTorrent users.
- Radarr: movie collection manager for Usenet and BitTorrent users.
- Jellyfin: Free Software Media System that puts you in control of managing and streaming your media.
- Jellyseerr: fork of Overseerr with support for Jellyfin and Emby. It can be used to manage requests for your media library.
- Jellystat: A free and open source Statistics App for Jellyfin.
Prerequisites
- Kubernetes cluster running on
amd64(because of TrueCharts dependency) accessible withkubectlCLI - Note: Tested on K3s cluster with default
traefikONI. - Install Helm
Helm repo
Get the TrueCharts Helm repository:
Setup environment variables
export MEDIA_NAMESPACE="media-center"
export STORAGE_CLASS="nfs-hdd" # changeme
export MEDIA_VOLUME_SIZE="4Ti" # changeme
export LB_IP="192.168.1.81" # changeme
Create base resources
Create namespace:
Create PVC:
cat <<EOF | kubectl apply -f -
apiVersion: v1
kind: PersistentVolumeClaim
metadata:
  name: media-pvc
  namespace: ${MEDIA_NAMESPACE}
spec:
  storageClassName: ${STORAGE_CLASS}
  resources:
    requests:
      storage: ${MEDIA_VOLUME_SIZE}
  volumeMode: Filesystem
  accessModes:
    - ReadWriteMany
EOF
BitTorrent client
Install the chart:
cat <<EOF > qflood.values.yaml
ingress:
  main:
    enabled: true
    hosts:
    - host: qflood.${LB_IP}.nip.io
      paths:
      - path: /
    integrations:
      traefik:
        enabled: false
operator:
  verify:
    enabled: false
persistence:
  media:
    enabled: true
    existingClaim: media-pvc
    mountPath: "/media"
EOF
helm install qflood truecharts/qflood --values qflood.values.yaml --namespace ${MEDIA_NAMESPACE}
After install you should be able to reach your Flood UI on your local network at qflood.${LB_IP}.nip.io.
Flaresolverr
Install the chart:
Prowlarr
Install the chart:
cat <<EOF > prowlarr.values.yaml
ingress:
  main:
    enabled: true
    hosts:
    - host: prowlarr.${LB_IP}.nip.io
      paths:
      - path: /
    integrations:
      traefik:
        enabled: false
operator:
  verify:
    enabled: false
EOF
helm install prowlarr truecharts/prowlarr --values prowlarr.values.yaml --namespace ${MEDIA_NAMESPACE}
After install you should be able to reach your Prowlarr instance on your local network at prowlarr.${LB_IP}.nip.io.
Sonarr
Install the chart:
cat <<EOF > sonarr.values.yaml
ingress:
  main:
    enabled: true
    hosts:
    - host: sonarr.${LB_IP}.nip.io
      paths:
      - path: /
    integrations:
      traefik:
        enabled: false
operator:
  verify:
    enabled: false
persistence:
  media:
    enabled: true
    existingClaim: media-pvc
    mountPath: "/media"
EOF
helm install sonarr truecharts/sonarr --values sonarr.values.yaml --namespace ${MEDIA_NAMESPACE}
After install you should be able to reach your Sonarr instance on your local network at sonarr.${LB_IP}.nip.io.
Radarr
Install the chart:
cat <<EOF > radarr.values.yaml
ingress:
  main:
    enabled: true
    hosts:
    - host: radarr.${LB_IP}.nip.io
      paths:
      - path: /
    integrations:
      traefik:
        enabled: false
operator:
  verify:
    enabled: false
persistence:
  media:
    enabled: true
    existingClaim: media-pvc
    mountPath: "/media"
EOF
helm install radarr truecharts/radarr --values radarr.values.yaml --namespace ${MEDIA_NAMESPACE}
After install you should be able to reach your Radarr instance on your local network at radarr.${LB_IP}.nip.io.
You can now configure Radarr: - In Prowlarr UI,
Jellyfin
Install the chart:
cat <<EOF > jf.values.yaml
ingress:
  main:
    enabled: true
    hosts:
    - host: jf.${LB_IP}.nip.io
      paths:
      - path: /
    integrations:
      traefik:
        enabled: false
operator:
  verify:
    enabled: false
persistence:
  media:
    enabled: true
    existingClaim: media-pvc
    mountPath: "/media"
EOF
helm install jellyfin truecharts/jellyfin --values jf.values.yaml --namespace ${MEDIA_NAMESPACE}
After install you should be able to reach your Jellyfin instance on your local network at jf.${LB_IP}.nip.io.
Jellyseerr
Install the chart:
cat <<EOF > jellyseerr.values.yaml
ingress:
  main:
    enabled: true
    hosts:
    - host: jellyseerr.${LB_IP}.nip.io
      paths:
      - path: /
    integrations:
      traefik:
        enabled: false
operator:
  verify:
    enabled: false
EOF
helm install jellyseerr truecharts/jellyseerr --values jellyseerr.values.yaml --namespace ${MEDIA_NAMESPACE}
After install you should be able to reach your Jellyseerr instance on your local network at jellyseerr.${LB_IP}.nip.io.
Configure Jellyseerr:
- Open UI at jellyseerr.${LB_IP}.nip.io.
- Connect using your Jellyfin server and account.
- Setup connection to Radarr and Sonarr.
Jellystat
Install the chart:
cat <<EOF > jellystat.values.yaml
ingress:
  main:
    enabled: true
    hosts:
    - host: jellystat.${LB_IP}.nip.io
      paths:
      - path: /
    integrations:
      traefik:
        enabled: false
operator:
  verify:
    enabled: false
EOF
helm install jellystat truecharts/jellystat --values jellystat.values.yaml --namespace ${MEDIA_NAMESPACE}
After install you should be able to reach your Jellystat instance on your local network at jellystat.${LB_IP}.nip.io.
Optional: BitTorrent client + VPN setup
Prerequisites
- Download a wireguard configuration from your VPN provider.
- Note: the following example is done with ProtonVPN that supports both wireguard and port forwarding for fast seeding.
- Use your existing
media-pvcPVC (or whatever name you use for it).
Setup
- Create a
qbittorrent.values.yamlfile with the following template updated with your wireguard configuration and ingress hostname:export QBIT_PASSWORD=<changeme> cat <<EOF > qbittorrent.values.yaml addons: vpn: config: | # PUT YOUR WIREGUARD CONFIG HERE env: VPN_SERVICE_PROVIDER: custom VPN_TYPE: wireguard VPN_PORT_FORWARDING: on VPN_PORT_FORWARDING_PROVIDER: protonvpn excludedNetworks_IPv4: - 192.168.1.0/24 # Replace with your local network CIDR type: gluetun ingress: main: enabled: true hosts: - host: qbit.${LB_IP}.nip.io paths: - path: / integrations: traefik: enabled: false metrics: main: enabled: false operator: verify: enabled: false persistence: config: enabled: true mountPath: /config media: enabled: true existingClaim: media-pvc mountPath: /media qbitportforward: QBT_PASSWORD: ${QBIT_PASSWORD} QBT_USERNAME: admin enabled: true EOF - Install the Helm chart:
- Once deployed, update the
qbittorrentdeployment to edit themountPathof thevpnconfigin theqbittorrent-vpn(Gluetun) container as follow: - After checking that
qbittorrentpod successfully running, navigate to your qbittorrent UI atqbit.${LB_IP}.nip.io, login with temporary admin password found in theqbittorrentpod logs, and go to settings > Web UI to updateadminpassword and set it to${QBIT_PASSWORD}. - Now wait for
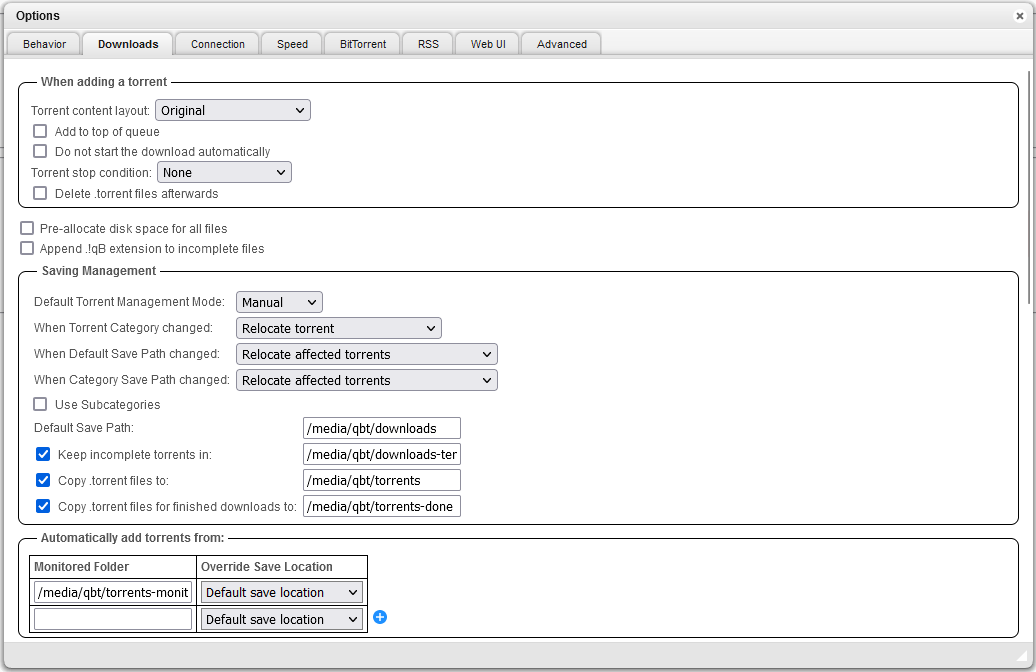
qbittorrent-qbitportforwardjob to complete, then go back to your qBittorrent UI settings to update the settings: - In Downloads, your downloads and torrents folders to target your media volume, e.g.:
- In Connection you check that the listening port is correct by comparing it with the one returned by your
qbittorrent-gluetunservice (curl http://qbittorrent-gluetun:8000/v1/openvpn/portforwardedfrom K8s namespace network).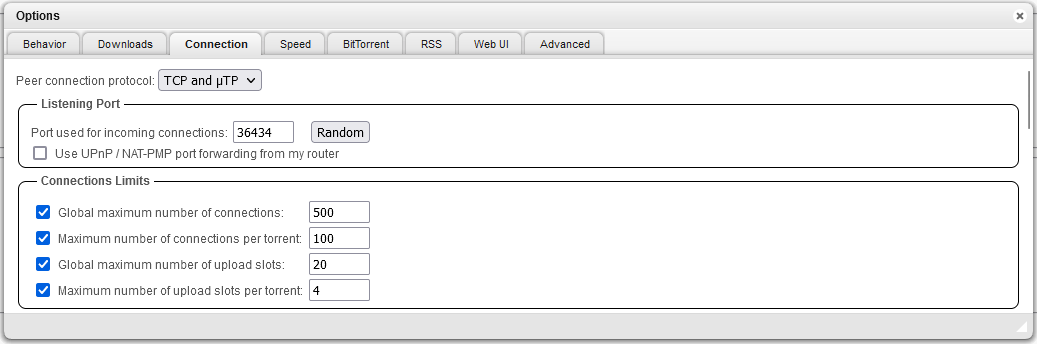
- In BitTorrent make sure
Enable Local Peer Discovery to find more peersis disabled. - In Advanced > Network interface: select the
tun0interface.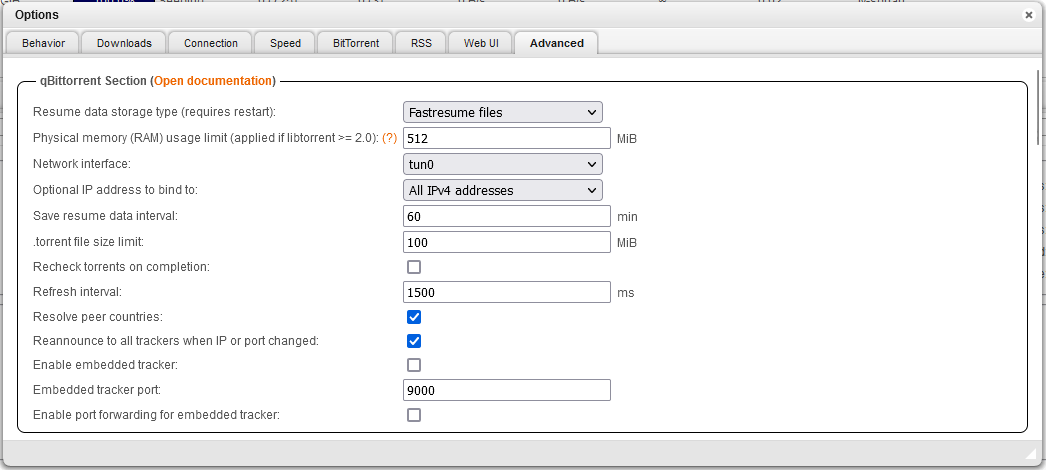
- You can validate that qbittorrent is using the VPN interface by using the magnet link from whatismyip.net and checking the IP that's returned.