Cloud-Native Toolkit - GitOps Install
Overview
Cloud-Native Toolkit is an open-source collection of assets that provide an environment for developing cloud-native applications for deployment within Red Hat OpenShift.
Components
As the name suggests, the Cloud-Native Toolkit provides a collection of tools that can be used in part or in whole to support the activities of software development life cycle. The following provides a listing of the assets that make up the Cloud-Native Toolkit:
Environment components
After installation, the environment consists of the following components and developer tools:
- A Red Hat OpenShift Service development cluster
- A collection of continuous delivery tools deployed into the cluster
- A set of backend services
This diagram illustrates the environment:
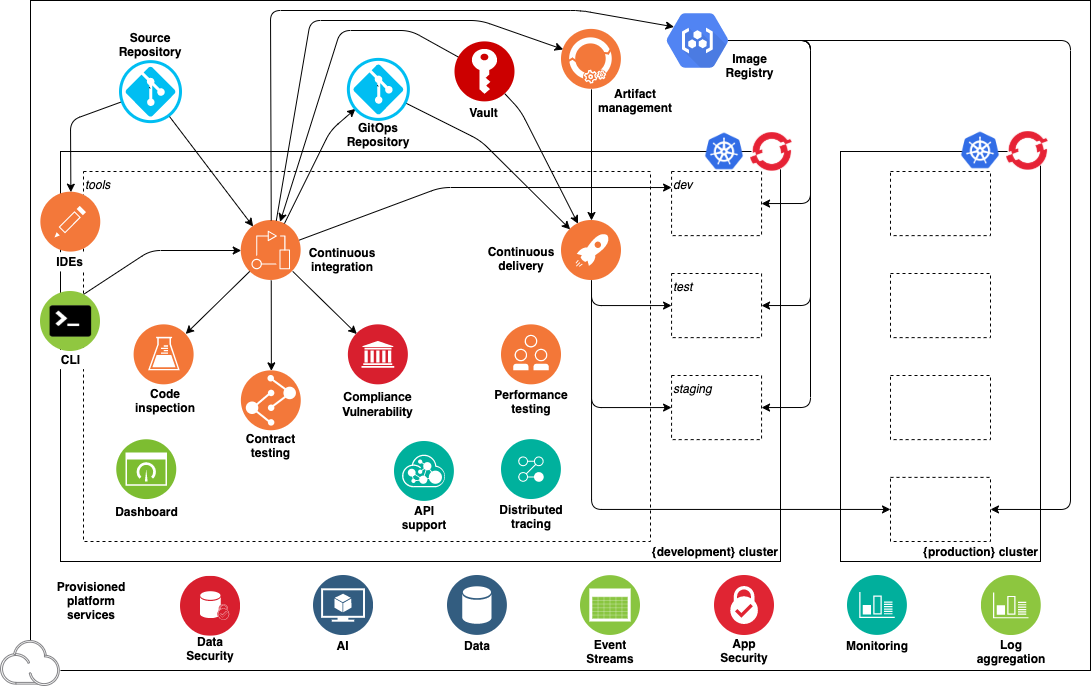
The diagram shows the components in the environment: the cluster, the deployment target environments, the cloud services, and the tools.
The following best-of-breed open-source software tools are installed in the cluster's tools namespace:
| Capability | Tool | Description |
|---|---|---|
| Continuous Integration | Tekton CI | Tekton is an emerging tool for Continuous Integration with Kubernetes and OpenShift |
| API Contract Testing | Pact | Pact enables API contract testing |
| Code Analysis | SonarQube | SonarQube can scan code and display the results in a dashboard |
| Container Image Registry | Container Registry | Stores container images to be deployed |
| Artifact Management | Artifactory | Artifactory is an artifact storage and Helm chart repository |
| Continuous Delivery | ArgoCD | ArgoCD support Continuous Delivery with GitOps |
| Web IDE | Code Ready Workspace | IDE for editing and managing code in a web browser |
Install the Toolkit
Prerequisites
- OpenShift Cluster available with admin access
dockerCLI available on your workstation- GitHub account
yqCLI installed on your workstation
On OpenShift Console
-
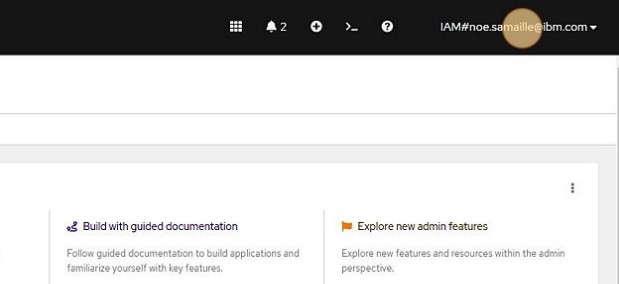
On the OpenShift console, click "Copy login command" on the top right corner:
-
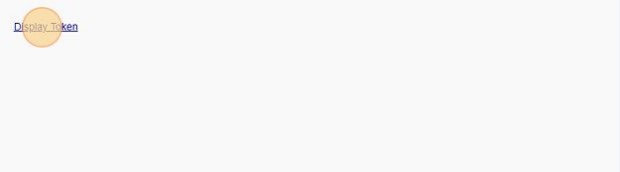
Click "Display Token":
-
Copy the
tokenandserverURL available in the providedoc logincommand
On your workstation
- Create a
cntkdirectory: - Install
iascableCLI: - Get OpenShift GitOps and Developer Tools Bills of Materials:
- Build both BOMs using
iascable: - Navigate to
outputdirectory and open a helper docker container that containsterraformCLI required to run the automation: -
In your docker container, create the required environment variables required to run the terraform automation on your OpenShift cluster:
export TF_VAR_config_banner_text="Cloud-Native Toolkit"
export TF_VAR_gitops_repo_repo=<GITOPS_REPOSITORY>
export TF_VAR_server_url=<OPENSHIFT_SERVER_URL>
export TF_VAR_cluster_login_token=<OPENSHIFT_SERVER_TOKEN>
Help
TF_VAR_server_urlis the OpenShift server URL you retrieved in the first stepTF_VAR_cluster_login_tokenis the OpenShift login token you retrieved in the first step
-
Navigate to
200-openshift-gitopsterraform module and run the automation:NOTE
By default, when not providing a
gitops_repo_hostterraform variable, a Gitea instance is being deployed in the cluster to host the GitOps repository, to install the developer tools we'll need to retrieve the provisioned Gitea host, username and token. -
We'll now need to login to the OpenShift cluster using the
oc logincommand from first step to retrieve Gitea credentials to pass to next terraform module: - Navigate to
220-dev-toolsterraform module and run the automation:cd ../../220-dev-tools/terraform export TF_VAR_gitops_repo_gitea_host=$(oc get route -n gitea gitea -o yaml | yq .spec.host) export TF_VAR_gitops_repo_gitea_username=$(oc get secret -n gitea gitea-access -o yaml | yq .data.username | base64 -d) export TF_VAR_gitops_repo_gitea_token=$(oc get secret -n gitea gitea-access -o yaml | yq .data.password | base64 -d) terraform init terraform apply --auto-approve
Artifactory initial setup
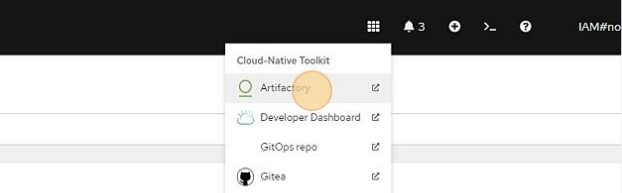
- Navigate to OpenShift console.
-
Click this icon
-
Click "Artifactory"
-
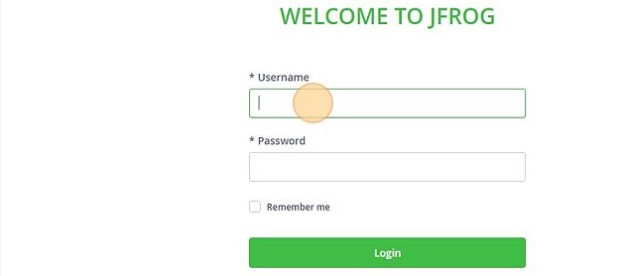
Log in using default username
adminand passwordpassword. -
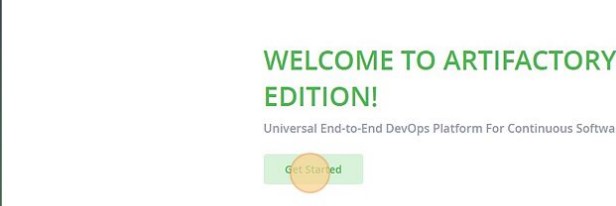
Click "Get Started".
-
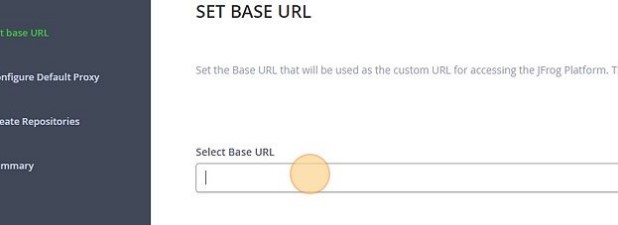
Reset password following Artifactory requirements, and save it somewhere safe (e.g. 1Password password manager). Then click "Next".
-
Paste the URL into the Select Base URL form and remove any trailing context roots, similar to the one in this view.
-
The next page in the wizard is the Configure a Proxy Server page. This is to setup a proxy for external resources. You can click Next to skip this step.
- The next page in the wizard is the Create Repositories page. Select "Generic", then press "Next".
- The next page in the wizard is the Onboarding Complete page. Press "Finish".
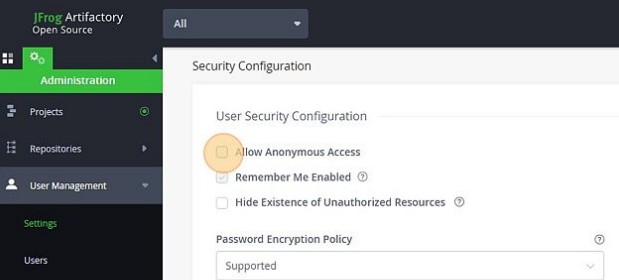
-
Allow Anonymous Access to Artifactory: Click on the Settings tab on the left menu (the one with the gear icon), and then select Security
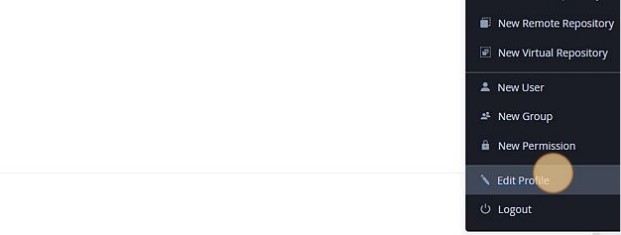
-
Obtain the encrypted password: In the Artifactory console, press the "Welcome, admin" menu button in the top right corner of the console and select "Edit profile"
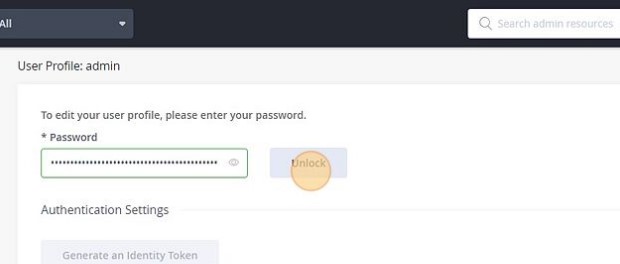
-
In the User Profile: admin page, enter you Artifactory password and press Unlock:
-
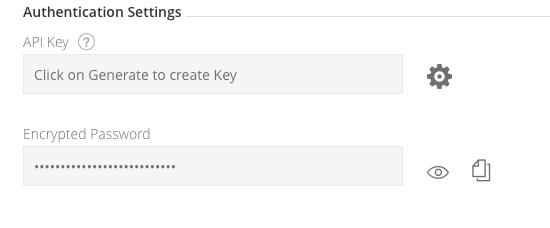
Below, in the Authentication Settings section, is the Encrypted Password field Press the Eye icon to view the encrypted password and press the Cut & Paste icon to copy it:
-
In the OpenShift 4 console, go to Administrator > Workloads > Secrets. At the top, select the tools project and filter for artifactory. Select Edit Secret on artifactory-access. Add a key/value for
ARTIFACTORY_ENCRYPTand set the value to your encrypt key value: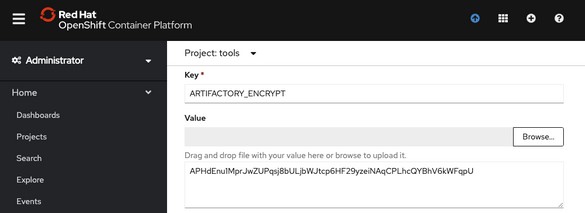
Sonarqube initial setup
- Navigate to OpenShift console.
-
Click this icon
-
Click "Sonarqube"
- Log in using default username
adminand passwordadmin. - Reset the default admin password by putting a custom one, save it for next step.
- Create the
sonarqube-accesssecret in OpenShifttoolsnamespace with your newly created admin password:
Add SETFCAP capability to pipeline Security Context Constraints
Note: This Step is only required if you are running the Toolkit on OpenShift 4.10+ with Openshift Pipelines operator < 1.7.2.
Add SETFCAP capability in allowed capability to pipelines-scc so cluster tasks can request it:
Update ibm-build-tag-push tekton task in tools namespace to request required SETFCAP capability, e.g. with task version 3.0.3:
oc get task ibm-build-tag-push-v3-0-3 -n tools -o yaml | yq '.spec.steps[2].securityContext.capabilities.add = ["SETFCAP"]' | oc apply -f -
Conclusion
At this stage the Cloud-Native Toolkit should be up and running, congratulations!